
Word templates
Create a Word template
A template is an ordinary Word file with commands of the form {# … #} in its text. You create it either
directly in the template editor in the browser or as a Word file that you upload. Both start in the same
place: the Data In- & Export tab, the Word reports button under Export. This opens the window Export Word report with the template library.
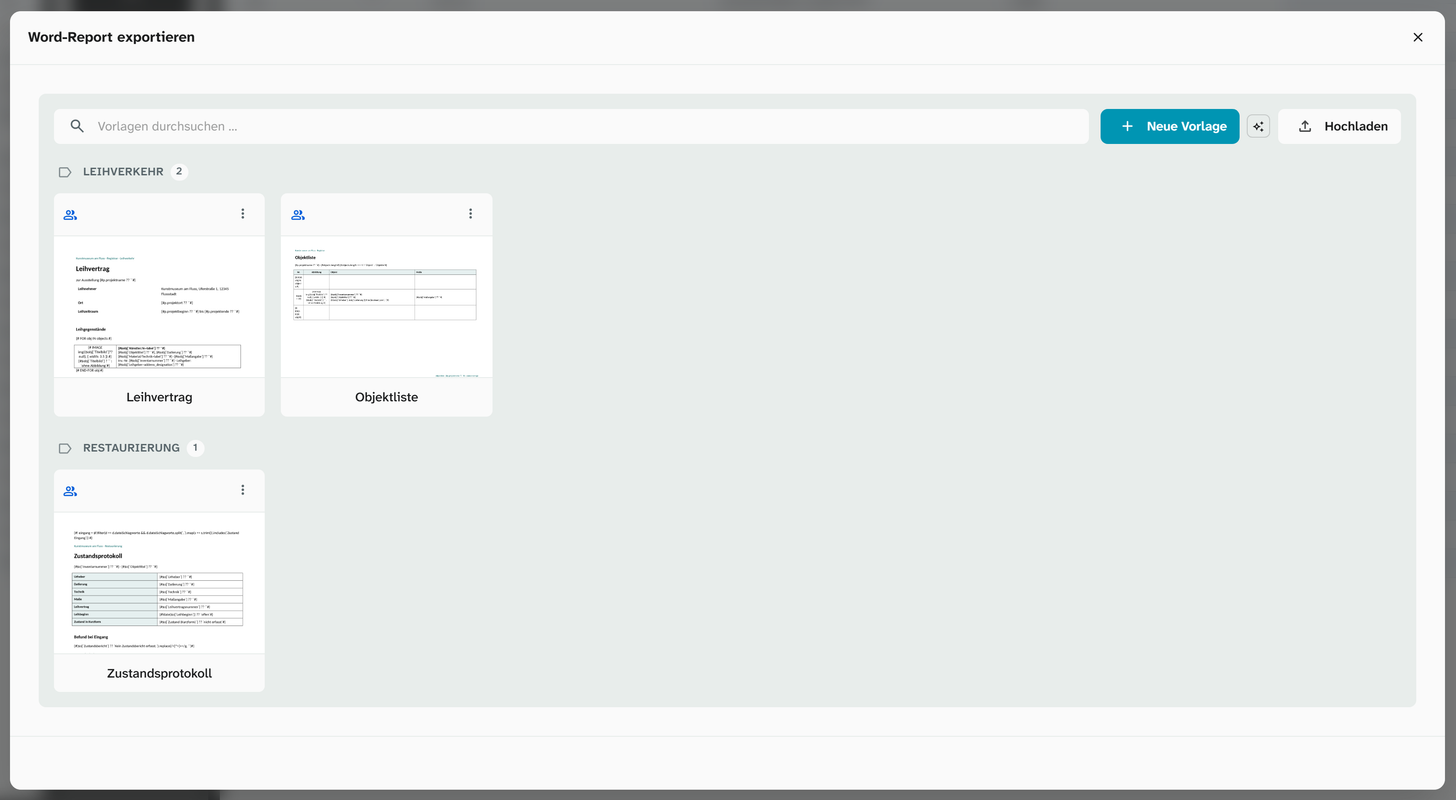
Create in the template editor
-
Click New template and enter a name. The editor opens an empty Word document in the browser.
-
Lay out the document as you would in Word: header, tables, paragraph styles.
-
Place the cursor where a value should go, and choose a field under Fields in the panel Moliri · Insert & edit on the left. For fields with an output formatter you choose there between Raw value and the formatting options, with a sample value. Insert places the building block at the cursor.
-
Save with Ctrl+S. The check and the preview then run by themselves. There is no separate save button.
-
Preview in the bar above the editor opens the report preview beside it, with the tabs Preview and Check. You set how many objects the preview uses under Objects there, or you switch on All objects.
The editor’s menus and toolbar appear in the language you have set in Moliri, even for a German template. The language of the document, shown in the status bar at the bottom, stays that of the template.
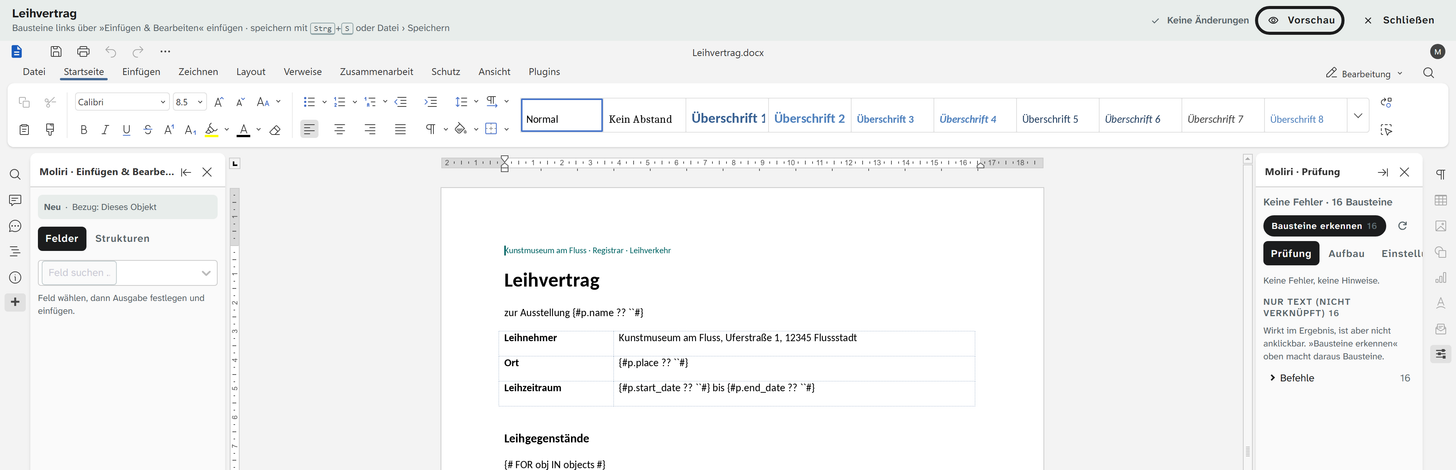
Insert and edit in the left panel
The left panel Moliri · Insert & edit follows the cursor. The line at the top says what the next click does. If it says New, a new building block is created; next to it is what the block Refers to, outside a loop This object. Inside a loop you choose there between Each row of the loop and This object.
If the cursor is inside an existing building block, the line names it, for example Field »Datierung«, and the panel shows its form. Apply writes the change into the block, Discard drops it, Delete removes the block. Edit code shows the command as text. A block without a matching form is called Custom expression and can be edited as code only. Insert new block leaves the block without moving the cursor.
Next to the Fields tab, Structures holds ready-made patterns in four groups:
| Group | Patterns |
|---|---|
| Loop & condition | Loop over all objects, Condition, Group by field, Running number |
| Values & calculations | Join fields, Sum / count / average, Set number format |
| Images & files | Image loop, Two image lists side by side, Attachment list (files other than images) |
| Object history & links | Events, Links, Link to the object in Moliri |
Each pattern carries a tag: Field means that clicking the finished block opens its form again, Code means it is edited as code afterwards.
The Links pattern inserts the links of one type, such as all references “documented in”. Under Output you can choose List (one line per link), All in one line, First only and Count; With additional details appends details such as the page. Like the view and the Excel export, Count also counts the links you may not read; of those, only the number appears, never the content.
Checking in the right panel
The right-hand panel Moliri · Check has the tabs Check, Structure and Settings. The Check collects whatever would go wrong on export: under Errors, loops and conditions that are not closed and expressions that do not run; under Warnings, fields that do not exist in the current project (Missing in project), and old field names; under Text only (not linked), commands that sit in the template as plain text. Detect blocks turns such text into building blocks. There is also the Field mapping, see below . Clicking an entry puts the cursor on the block, and the left panel shows its form.
Structure lists all commands in document order, separated into body text, tables, and headers and footers; By type sorts them by fields, formatted values, numbers, images, loops, conditions and definitions instead. Unused lists the project fields that do not occur in the template.
Under Settings, the Result section sets whether one document per object or one for all is created
(Document split), how separate documents join (Transition between objects) and whether the values
appear As plain text in the report. These settings travel with the template, see Template syntax . In the Editing section, Unlock blocks frees the blocks for formatting, and Code in the document shows the commands between {# and #} at normal size, smaller or with readable names. The result stays the same.
Upload a Word file
If you prefer to write in Microsoft Word, with or without the Word add-in , upload the finished file. Moliri then asks what should happen with the file:
| Choice | Result |
|---|---|
| Use directly | Create a report from this file. It is neither uploaded nor saved |
| Save to library | Upload the file and place it in the template library |
| Edit in EuroOffice | Upload, save in the library and continue editing in the template editor |
Use directly is the right choice for trying things out: errors show up without filling the library.
If the file still contains a field name from before the switch to English names, such as p.projektname instead of p.name, the dialog lists the pairs it found above the choices under Old names in the template. Such names stay empty in the report. Rewrite puts today’s names into the
file before you pick one of the three options; anything that could not be rewritten is listed in the note
afterwards.
Have a template drafted
Next to New template is the icon Copy prompt for a template (an asterisk). It places a ready-made request for a language model of your choice on the clipboard. It contains the rules of the template language from this area and the project’s field catalogue, that is the names, field types and subfields of the fields you are allowed to read. It contains no object data.
At the very top of the copied text there is an empty line AUFGABE (task). There you describe in one or two sentences what the template should do, such as “object sheet with image, title, dating and dimensions, one object per page”. Moliri sends nothing to a language model. You copy the template text the model returns by hand into the template editor or into Word. After that the check shows, as for any other template, whether the commands run and the fields are right.
Field names
Commands address fields by their field name, the designation of the field, not the label on the layout (input form). In the template editor and in the Word add-in the fields are offered for selection. If you write by hand, you find the name in the field metadata of an object.
Field names apply per project. A template from another project works as far as the names match. A field that does not exist in the project stays empty in the report until you map it to an existing field.
If a field is renamed under Data model › Fields, Moliri rewrites the saved templates to the new name. Anything that could not be rewritten is reported in a warning; the affected places are listed in the report of that run.
Map missing fields per project
In the template editor, the Check tab lists under Field mapping every field of the template that does not exist in the current project, with a field selection next to it. Choose the field the export should read from instead. The choice is saved in the template and applies to this project only. The template’s commands do not change, and in other projects the mapping has no effect. The Check tab of the preview lists such fields under Mapped.
On export, the mapping table is prefilled with this choice, marked from the template. You can still change it there for a single report, see Create a Word report .
Write commands by hand
A field value with an empty fallback:
{#$o[`RegNr`] ?? ``#}
The part after ?? is an empty fallback. Without it, an empty field can cause follow-on errors; it
belongs on every field.
Word likes to replace straight quotation marks with typographic ones. Moliri tolerates this, but backticks are still the safe choice, because Word never changes them:
{#$o[`Objekthöhe`] ?? ``#}     recommended: backticks
{#$o["Objekthöhe"] ?? ""#}     risky
The commands to start with
| Goal | Command |
|---|---|
| Insert a value | {#$o[`Feld`]#} |
| Insert a formatted value | {#ffmt($o, `Feld`)#} |
| Only if a condition holds | {# IF $o[`Status`] === `Dauerleihgabe` #} … {# END-IF #} |
| Over all images | {# FOR file IN $f #} … {# END-FOR file #} |
| Insert an image | {# IMAGE img($file, { width: 6 }) #} |
Example: an object sheet
Image, core data and dimensions of an object. The field names come from a sample project:
{#IMAGE img(($o[`Titelbild`] ?? null), { width: 8, height: 6 })#}

{#$o[`RegNr`] ?? ``#}, {#$o[`Originaltitel`] ?? ``#}

Künstler:  {#[$o[`Kuenstler_Vorname`], $o[`Kuenstler_Zuname`]].filter(Boolean).join(` `)#}
Datierung: {#fdate($o[`Datierung`], `JJJJ`) ?? `o. J.`#}
Material:  {#$o[`Material`] ?? ``#}
Maße:      {#ffmt($o, `Maße`) ?? ``#}
The ?? null on the image field makes sure that objects without an image get a placeholder instead of an
error.
Inside a loop, the loop variable is written with a $ in front, $file rather than file. This is the
most common source of errors, see Template syntax .
One document, or one per object
The template decides this, not the export dialog:
| Template | Result |
|---|---|
No FOR loop over objects | One document per object, then merged or as a ZIP |
A FOR loop over objects | One document with all objects |
If you build a FOR loop over objects into a per-object template, it becomes a template for a single
document. A total count needs no loop: {#objects.length#} leaves the mode unchanged. If the detection
gets it wrong, the template editor sets the mode in the right-hand panel under Settings › Document split.
Test and file it
For testing, narrow the object selection down to two or three objects. Errors show up just the same, and the run takes seconds. Only export with all objects once the template is right.
In the library each template has Edit, Edit copy and Change category. Categories group the list, and the search finds templates even with typing errors.
Further reading
- Recipes : loan agreement, object list, condition report
- Word add-in : write templates in Microsoft Word
- Create a Word report : generate the report from the template
- Template syntax , variables , functions