
Transcribe by Moliri
Library
The library is the start page of Transcribe. This is where recordings go in, where the jobs run and where the finished transcripts are. On the left are the areas, on the right the recordings of the selected area.
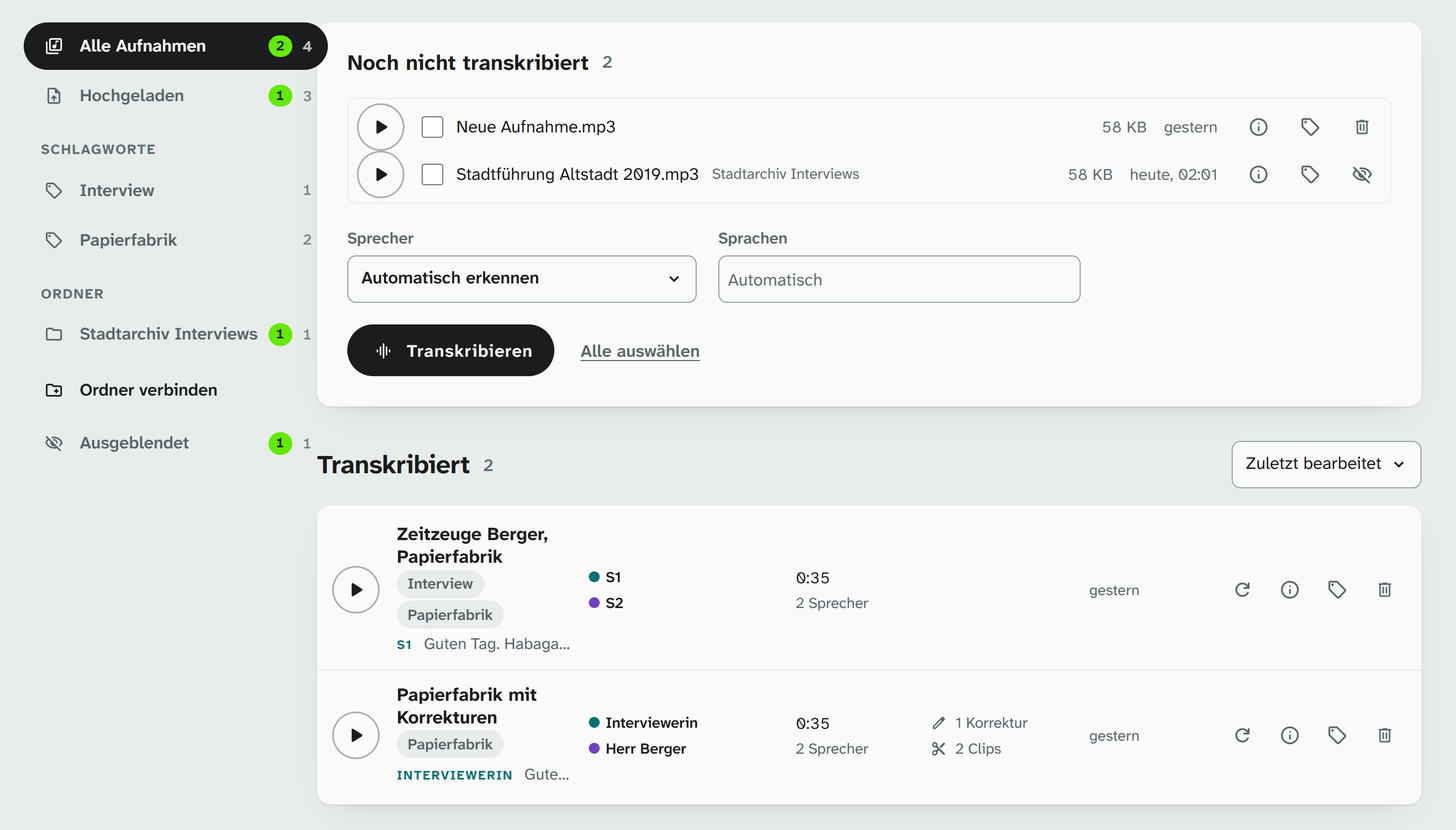
At the front of each row the button for listening, at the end the buttons for details, name and keywords, and delete or hide.
Adding recordings
Drag audio or video files into the window, whole folders too, or choose Dateien hinzufügen (add files). Transcribe then asks for speakers and languages and starts with Transkribieren (transcribe). Später (later) only files the recordings away; they then appear under Noch nicht transkribiert (not yet transcribed).
If you do not want to be asked every time, tick Künftig sofort starten, ohne Nachfrage (start straight away from now on, without asking) when adding files. The defaults for this are under Einstellungen → Neue Aufnahmen (settings, new recordings).
Connecting a folder
If the recordings are already in a folder, such as a shared Nextcloud folder, Ordner verbinden (connect folder) on the left brings them into the library without copying them. Choose the folder or paste its path and click Verbinden (connect). All recordings in it and in its subfolders then appear in the library, and new ones are added by themselves. Depending on the setting, Transcribe puts each transcript as a file next to its recording; anyone who shares the folder then sees the same transcripts and corrections.
In a connected folder, Transcribe deletes and moves nothing. Ordner trennen (disconnect folder) above the folder’s list takes it out of the library again; recordings and transcripts stay where they are.
Speakers and languages
| Setting | When to change it |
|---|---|
| Sprecher (speakers) | The app usually recognises by itself how many people are speaking. A fixed number helps when voices are similar or someone only speaks briefly: 1 for a talk or a guided tour, 2 for an interview |
| Sprachen (languages) | Without a setting, the app recognises any language. If you name the languages that occur, it only chooses among them. This helps with dialect and short passages in another language |
For a single recording under Noch nicht transkribiert, click the box in front of it, choose speakers and languages, and click Transkribieren.
What is running
Under In Arbeit (in progress) each job is listed with its progress. If a job fails, the reason is shown there; Erneut (again) restarts it, Entfernen (remove) takes it off the list.
The finished transcripts
Each transcribed recording appears under Transkribiert (transcribed), with the start of its transcript, the speakers, the length and the number of corrections made by hand and of clips. You can sort by Zuletzt bearbeitet (last edited), Name or Länge (length). From four transcripts on, the field next to it searches names, speakers and text. Clicking the title opens the recording in the editor .
The arrow in a circle transcribes a recording again, with a different number of speakers, for instance. Your corrections made by hand are kept.
Listening and details
The button at the front of each row plays the recording, even one that has not been transcribed yet. A bar with the title and playback then appears at the bottom; the cross closes it.
The button with the i shows what is in the file: file name, location, size, length, when it was recorded (if the file says so), when it was created and changed, format, audio and, for videos, the picture, along with the state of the transcript. Here, too, you can play the recording, and Im Editor öffnen (open in editor) takes you to the transcript.
Name and keywords
A recording is first named like its file. The button with the label opens Name und Schlagworte (name and keywords). The name only applies in Transcribe and the file keeps its name, which is why this also works in connected folders. When you export, the transcript and a compilation of clips are named like the recording in Transcribe.
Separate keywords with commas, such as „Interview, Papierfabrik“. The keywords already in use are listed below and can be tapped. Each recording shows its keywords in its row, and on the left all keywords appear as areas of their own: a click shows all recordings with that keyword, as does a click on the keyword in a row. In the editor the keywords appear next to the title and open the same dialog.
Hiding and deleting
Uploaded recordings and live recordings can be deleted with the bin. Transcribe asks first, because the recording takes its transcript with it, including all corrections, speaker names and clips, and this cannot be undone. If the recording is still waiting for its job, the job goes too. While it is being transcribed, deleting is blocked; cancel the job first.
Recordings in connected folders are not deleted but hidden: instead of the bin they show the eye with a line through it. In the dialog Name und Schlagworte, Ausblenden (hide) is available for every recording. A hidden recording no longer appears in any area except Ausgeblendet (hidden) at the bottom left; the file and transcript stay. Next to the message at the top, Rückgängig (undo) reverses the hiding straight away; later, the open eye under Ausgeblendet brings the recording back.
The areas on the left
| Area | What it shows |
|---|---|
| Alle Aufnahmen (all recordings) | Everything except the hidden recordings |
| Hochgeladen (uploaded) | What was dragged into the window or added. It is kept in the Transcribe data folder |
| Live-Aufnahmen (live recordings) | Recordings saved on the Live page, once there are any |
| Schlagworte (keywords) | One area per keyword, once one has been given |
| Ordner (folders) | One area per connected folder, with Ordner verbinden (connect folder) below |
| Ausgeblendet (hidden) | The hidden recordings, once there are any |
The number on the right counts the recordings in the area, the number before it those without a transcript.