
Setup: guides
Build an input form
A layout (input form) decides which fields are shown together during data entry. It appears as a tab in the object view.
-
Open Data model › Layouts and create a New layout. The layouts are shown as tabs at the top. In the editor below, the toolbar is on the left, the grid in the middle and the properties on the right. There, in the Layout tab, set the Name; it becomes the tab name. To change the order of the tabs, drag a tab at the top to its new place; with the keyboard, Alt+arrow key moves the selected tab by one place.
-
Place tiles. Pick a tool in the toolbar on the left, then click into the grid. The grid shows beforehand where the tile will land. A click places it in its usual size, a dragged rectangle in exactly that size. The new tile is then selected and its properties are shown on the right.
Tool Key Tile Field F A field from the data model Text T Free text to structure the form (label) Files D The object’s files, by filter Events E The object’s events, by type Links L The object’s links to authority data, addresses or objects Virtual U A calculated field, for display only Select (key V) is the tool for selecting and moving. Esc cancels a tool. A right-click into the grid offers the same kinds.
-
Arrange and label the tiles. A tile can be dragged and resized at its edges. While you drag, the grid appears and the tile snaps to the grid, guides and neighbouring tiles; Snap at the bottom of the toolbar switches this off. The arrow keys move the selected tiles by one grid unit, with Shift by five. Clicking a tile shows its properties on the right in the Selection tab. There the Label may differ from the field name and may be formatted: the bar above the text offers bold, italic, underline, strikethrough and link, and for a text tile also the text style (text or heading), size, alignment, text colour with highlight and the placeholders. Ctrl+Z undoes. The Background color of a text tile is one click on a colour swatch; the colourful swatch at the end opens the free colour picker. A Label height of
0hides the label entirely. Hold Shift to select several tiles and move, lock, copy them into another layout or delete them together. -
Configure the areas. See below.
-
Assign it to projects and grant permissions, on the right in the Projects and Rights tabs. Both are needed, otherwise the tab does not appear. If you switch on Default for new projects, the layout is switched on automatically in every project created from then on.
-
Check with an account that has status 3.
Configure a file area
There are three lists, combined with AND. Within one list, OR applies.
| List | Example |
|---|---|
| File types in this region | Image, PDF document, 3D model |
| Keywords in this region | Zustand (condition), Rechnung (invoice) |
| File extensions in this region | pdf, docx, zip |
An empty list does not restrict anything.
A file dragged into the area receives its keywords. Word templates reach all of the object’s files, whichever area they are in.
Configure an event area
Under Event kinds, enter the kinds the area should show. Empty means all readable kinds. This lets you build forms for specific tasks, such as a conservation form showing only conservation treatments and a loans form showing only loans.
Configure a link area
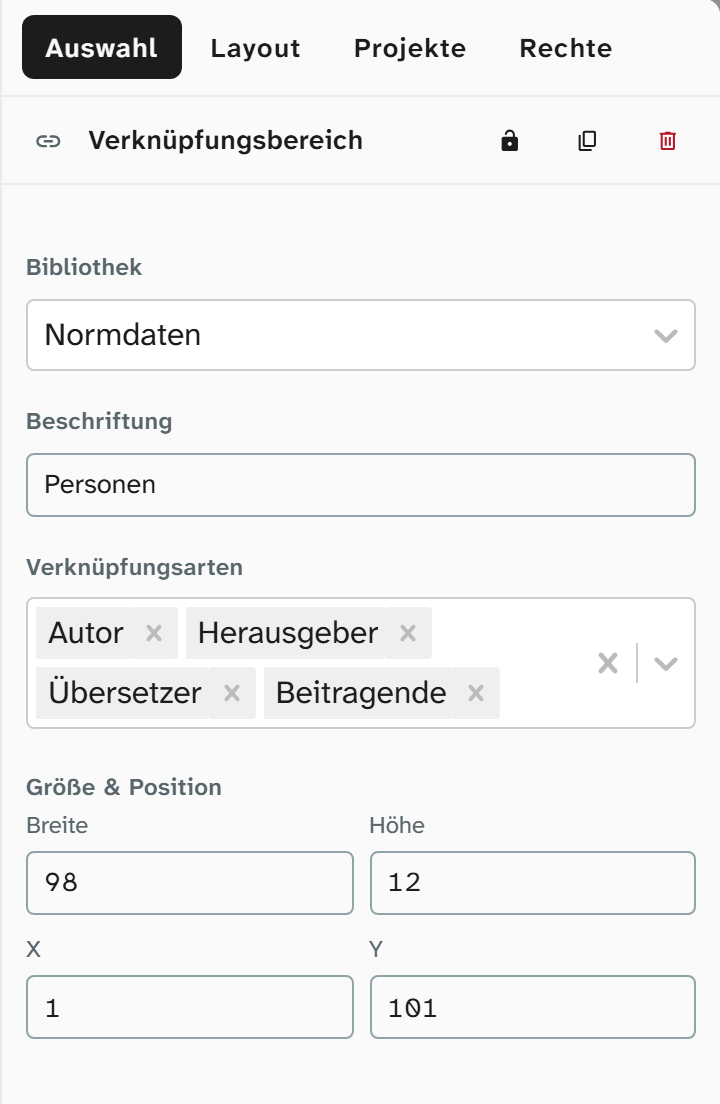
Place a new area with Create link area. It starts with the library Authority data and all types. Clicking it shows on the right, in the Selection tab:
-
Choose the Library: Authority data, Addresses or Objects. With Objects, Backlinks switches the area to the objects that link to this one.
-
Under Link types, choose the types, for example Autor (author) and Herausgeber (editor) for an area “Personen” (people). Empty means all readable types.
-
If needed, enter a Label. If it is empty, the name of the type or the library appears above the area.
The types that exist and how they behave are described under Link types .
Dynamic layout
Besides the layouts you build, the object view has the tab Dynamic. It arranges the image and text fields chosen in the view settings in a grid automatically. It is not built; it follows each person’s own field selection.
Design rules that have proved useful
| Rule | Why |
|---|---|
| One form per activity, not per department | Someone who does both does not need two tabs |
| Fewer fields, larger tiles | A form with 80 fields does not get used; three with 25 each do |
| Labels to structure the form | They cost nothing and replace any explanation |
| Important things at the top left | That is where people look first |
| Large image | A thumbnail 3 cm wide helps nobody |
| Maintain sample content | The editor shows it in place of real values; without it you build blind |
When a form does not appear
There are two causes:
- The layout is not switched on in the project. This also applies to status 6 and 9.
- The permission for it is missing (for status 3).
See Permission model .
Further reading
- Layouts : all tile properties
- Create a field
- File library