
Reference
Interface
The interface has three states, and your work moves back and forth between them:
- The project overview, the start page after you sign in. All projects you have access to, grouped by status, with the project timeline below.
- The open project, split into the sidebar and the workspace . Each shows a view of its own, independently of the other. Useful combinations include the calendar on the left and an object on the right, or a table on the left and bulk edit on the right.
- The open object, the object view in the workspace, with the project’s layouts (input forms).
Above everything sits the main menu: projects, libraries and the administration areas, as far as your status allows (see Administration areas ).
Project overview
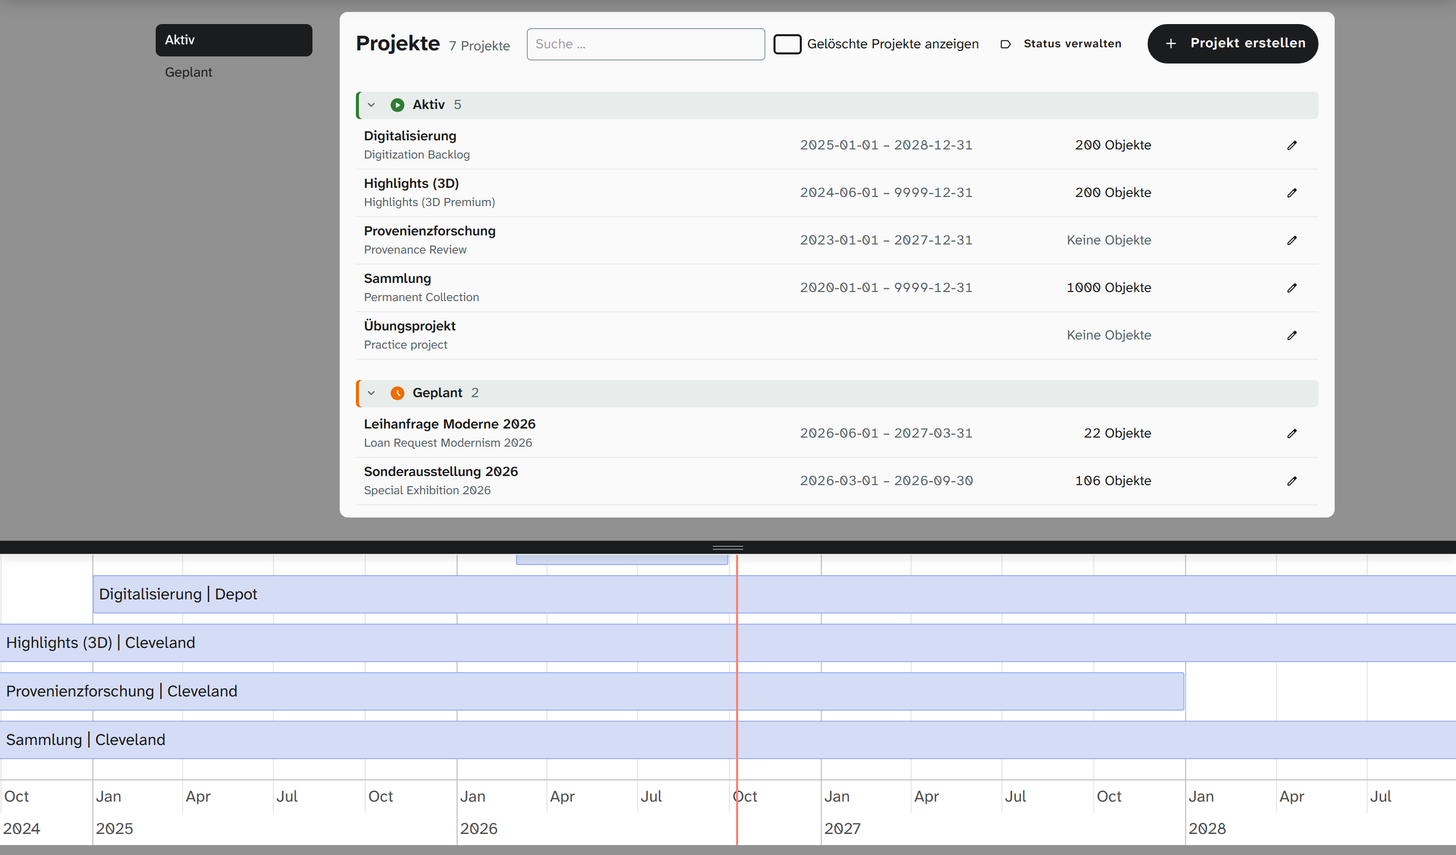
Projects are grouped by their project status, for example Active, Planned or Completed; projects without a status appear at the top under No status. The administration sets the order of the groups, and each status can carry an icon and a colour (see Manage statuses ). Click the header of a group to fold it away or open it again. Moliri remembers this for your account, also after signing in again. While there is text in the search box, all groups are open. The search box at the top (Search …) finds projects by name and period, with fuzzy matching. Each row shows:
| Column | Content |
|---|---|
| Title | Project name, with the English name below it if there is one. Click it to open the project |
| Period | Start and end, if entered |
| Objects | Number of objects, for example 12 objects or No objects |
| Note | read only if your account only has read access in the project. Accounts with status 6 or higher never see this note |
You only see projects you have access to. An empty overview is a question of permissions, not an error. With status 9 you also see Create project, Manage statuses, an edit button on each row and the switch Show deleted Projects.
Project timeline
Below the list is the project timeline: every project with a start and end shown as a bar on a time axis, labelled with its name and place. This shows you which exhibitions run at the same time. When you move the pointer over a bar, the matching row in the list is highlighted.
You can drag the divider between list and timeline; if you push it all the way, a tab at the edge brings the timeline back. Projects without a valid period and deleted projects do not appear. If no project has a period, the timeline reads No project with a valid date range. The period is maintained in the project settings during setup, see Create a project .
Basic rules of use
- One click is enough. You never need to double-click.
- A field saves when you leave it, without a save button. A green flash confirms the save, orange means saved but changed, flashing red means not saved. See Object view .
- Selection menus search with fuzzy matching. Typos and abbreviations work too: oho finds Objekt Höhe.
- The footer pages through objects. Position and count are in the middle, the paging buttons on the left and right, and Create new object next to them on the right.
Tasks and uploads
On the left of the project footer, next to the Wahl, is the status line for everything that runs in the background: uploads, Word and Excel exports, Excel imports and bulk edits. With no tasks it shows only a lightning bolt. When tasks are running, it shows their number, a shared progress bar and their kinds, for example Word · Import, and small thumbnails for image uploads. If a task has failed or been interrupted, the status line turns red and shows Needs attention; nothing opens by itself. The button next to it uploads files to the open object. With no object open it is disabled.
Click the status line to open the Tasks & Uploads panel, and press Esc to close it again.
The tabs All, Uploads, Exports, Imports and Edits filter by kind, History shows what is
finished. Each row gives the title, progress and state (Running, Waiting, Paused, Needs attention, Done) and offers whatever is possible at that moment: Download or View for a
finished result, Retry after an error, pause and cancel. Labels such as Project 12 or Object 345 tell you what a task belongs to; they are left out for the project and object that are currently open.
The Compression icon at the top right sets the image compression for uploads.
Finished tasks stay in the status line and under All for one more minute, then only under History, until Clear finished removes them. The minute only counts while the tab is visible and the panel is closed. After a page reload, the exports, imports and edits of the last day appear straight away in the history, but without their results: nothing can be downloaded any more. Whatever was still running at the reload is listed under Needs attention with the note Interrupted by page reload, together with the hint that the result is no longer available.
Keyboard shortcuts
Navigating objects with the keyboard, in an open project:
| Shortcut | Effect |
|---|---|
Alt + → | Next object in the selection. After the last one it continues with the first |
Alt + ← | Previous object. Before the first one it continues with the last |
Alt + ↑ | First object in the selection |
Alt + ↓ | To the object view: the object opened last, otherwise the first |
In dialogs that page through a list, and in table fields:
| Shortcut | Effect |
|---|---|
Alt + ↑ / Alt + ↓ | Previous / next entry, without closing the dialog |
Esc | Close the dialog |
Alt + ↑ / Alt + ↓ in a JSON table | Move the row up / down |
The shortcuts also appear in the tooltip shown when you hover over the paging buttons. Beyond these there is no full set of keyboard shortcuts; individual tools such as Resolve references have their own.